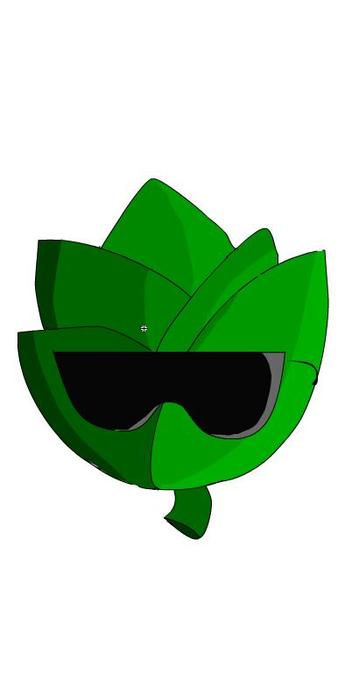
Ok so I posted Pokerap which was a music video and got some pretty mixed reviews, half of the reviews were 4 or 4.5 and the other half were 0-2 out of 5 most complaints being on the shading and use of pokemon characters, so I got Jacob to record some lines for an animation I've been wanting to do sense 8th grade, the animation being Mr. Artichoke and before I continue animating I would like to get some feed back on the main characters design.
I make animations and animation accessories. My fursona is an anthropomorphic parrot.
Male
Joined on 6/27/11
- Level:
- 20
- Exp Points:
- 4,420 / 4,440
- Exp Rank:
- 11,188
- Vote Power:
- 6.23 votes
- Rank:
- Pvt. First Class
- Global Rank:
- 2,877
- Blams:
- 118
- Saves:
- 2,956
- B/P Bonus:
- 20%
- Whistle:
- Bronze
- Medals:
- 105
Animation
Comments
Also, would probably look better with polished detail, perhaps giving a rim to the frame of his shades with perhaps a wrap-around strap considering how limb based ear support is clearly out of the question.
Perhaps you could make the lense of the shades itself into a Movie Clip Symbol separate from the one hosting Mr. Artichoke's figure and the frame and strap of the shades, then bring the lense Movie Clip Symbol into the Mr. Artichoke Movie Clip Symbol and make the lense transparent by selecting the Alpha property in the Color drop down list of the lense Movie Clip Symbol from the properties tab and experiment with the figure in the percentage meter for the Alpha option to your heart's content. Be sure that the lense Movie Clip Symbol is on a layer between the Mr. Artichoke figure and the frame of the shades so that the lense doesn't overlap it's own container.
In addition, you could also give the same treatment to the reflection coming off his shades by putting them into their own Movie Clip Symbol and layering them on top of the shades within the Mr. Artichoke Movie Clip Symbol, only instead of adding a transparency effect add a glow effect from the Filters tab, there you can experiment with the length and extreme of the reflection by adjusting the Blur, Strength and Quality settings therein. Also, be sure that the glow color is white as the default setting is red. Prior to doing this, however, I recommend that you recreate the reflection so that it doesn't connect with the edge of the lense and is self contained to give emphasis to the shape of the lense. Be sure that this is on the top layer.
Also the shading is nonsensical in the fact that it only works in the context that light is always and exclusively coming from the right. In a general context the default shading should have the shadows appear just above the point where one leaf becomes overlapped by another and should curve with the outlining of the leaf in the foreground, meaning that the shadow at the peak of the Artichoke should have a 'V' shaped shadow at it's bottom. The lighter shading should be placed somewhere near the middle of each leaf meaning that there should be a diamond shaped light reflection centered at the peak above the 'V' shape.
When dealing with something relatively simplistic like this, adding attention to detail is kinda warranted.

Psychopath
Next time don't save the file as a JPEG, save it as a PNG instead.
I guess the design isn't bad if you're just gonna use this example as his default form for the whole movie, but it does need to be cleaned up quite a bit.
#1: I see breaks in the outlining mostly on the right side. To remedy this, select the Ink Bottle Tool and click in the areas where the outlines break apart to reconnect them.
#2: Certain fragments of the outlines invert against the curve of the rest of the line, these occur mostly on the right side and at the bottom. To remedy this, select the Selection Tool to manually reverse these inverted parts of each outline, the option to do so will be prompted when the bottom right quadrant of a circle appears next to the Selection Tool as you hover your cursor around the line, be sure that when you receive this prompt that the Selection Tool is near the inverted section of the line and nowhere else, otherwise you'll end up reshaping the parts of the outlining that are already curved in the correct arc. This can also be achieved by double clicking the one outline to select all the outlines and clicking on the Smooth option to your hearts content, but be aware that this technique will alter the shape of the figure in it's entirety.
#3: I noticed some redraw regions at the bottom left corner of both the artichoke figure itself and possibly his shades, you need to select the Selection Tool and manually use it to delete the excess outlines that don't constitute his figure; if I'm seeing it correctly, they're on the inside. You'll probably have to magnify the stage to see them to their full extent before being able to completely remove them which can be achieved by adjusting the number within the percentage meter adjacent to the Timeline or by selecting the Zoom Tool [magnifying glass] and zoom in manually.